Showing posts with label dramatic style. Show all posts

Wednesday, June 13, 2012

Styling Built Ins

Oh the magic of white trim paint! The oak built in cabinets below made this room feel outdated and too casual. 
Using white trim paint and minimizing the shelf styling, this room is transformed into a lighter, brighter space. 
An appropriately sized Television was installed in the center cabinet with the shelf moved to the lowest pegs. I styled this whole cabinet with $80 at TJMaxx and a few of the homeowners books (jackets removed and brow paper bag covers on any brightly colored books.) 
The digital frame on the bottom right was made by the home owner from his old laptop - great idea!!

Tuesday, June 12, 2012

Product Review: RustOleum Cabinet Transformations

This week, while working onsite styling this home, we decided to tackle the kitchen cabinets the owner hated.

They had oak cabinets and an oak floor, and if you don't like oak, this was not a desirable look. The countertops were a solid white Corian in great condition. The owner originally wanted the cabinets to be a glazed white or cream, but with the white countertop and back splash, the cabinets could have looked dirty.  
Because I had been wanting to try the RustOleum Cabinet Transformations product, I decided we would use that to change the cabinets. The product boasts of no sanding or stripping needed, just clean, paint, glaze, and seal.
This product review is NOT sponsored by RustOleum- just my honest experience working with this product for the first time.
After watching the instructional DVD, we took the doors off the cabinets and removed the drawers. (Cumbersome, but definitely necessary!!!)We removed the decorative valance from over the sink and replaced it with a piece of wood trim. Removing the trim piece took hammering from the back side since it was installed with finish nails. 
Step 1 - you apply the deglosser with the provided scrubby pad on all surfaces. This product did not have a very harsh smell (maybe about the level of nail polish remover) and seemed to work like a cleanser, removing grime, but not much of the gloss. 
The next step was to add the Bond Coat, which is the paint color you have mixed at the hardware store. 
 We selected Seaside which was a light blue gray. 
 The first coat did not cover well, so it needs at least two coats.
After two coats.
The next morning, we were able to apply the second coat and let it dry for 3 hours.
Although the home owner helped me paint the cabinets, he was uncomfortable with the glazing step. His wife did not want the heavy, even glaze displayed on the box. She wanted a more high end look with most of the glaze in the corners and in the panel detail.
Following the instructions on the DVD, I applied the glaze (which was really thin and watery) with a brush and wiped gently with the cloth provided. 

And TA DA..... it wiped the paint right off! WHAT!?! 
So...I decided to throw the instructions out the window and use my distressed faux finishing technique I have talked about before (and clean up most of the glaze with a moist paper towel). You get 1 very, very gentle wipe with the provided cheese cloth before the paint comes off and if it doesn't look like you desire - too bad, I guess. I ended up only glazing the panel detail.

The cabinets ended up looking GREAT. However, I am not a first time DIYer, so I feel like I may have had an advantage over the beginner DIYer. This process may look easy, but it was not. This is a product that should only be used by serious DIYers OR if you hate your cabinets so much  that anything would be better than what you have - AND you have a lot of time to start over until you get it right. 
I,will not be using this product again. I think it would have been more effective to tint a can of Latex Kilz and then glaze with 3 parts acrylic medium (a paint extender) and 1 part paint/stain/glaze.  
Although the box boasted of 24 hours to complete, it took two of us almost 72 hours.
Glazing definitely took more than "paint on and wipe off," as the instructions indicated. I recommend using my paint distressing technique . We did not use any glaze on the cabinet boxes/frames for the look above. I applied glaze only in the carved part of the doors and distress painted the edges of the doors and drawers. 

**Kudos to RustOleum, who refunded our money since we were not 100% satisfied!**

Friday, May 4, 2012

Craving Affordable Dramatic Style


Dramatic style is possible with a small budget and can even be achieved in a temporary space. Have you considered using your walls as gallery space to display sculpture?
Anthropologie Stores; photos collected by EffortlesslyAnthropologie
 Just about every young or creative person I know loves Anthropologie. Even if they do not own a single item from there, they love to walk through the store and browse the carefully curated spaces and products.
In fact, it is the number one requested style description my clients have used to explain the style they would like in their space. 
Anthropologie Stores;  photos collected by  EffortlesslyAnthropologie

I think what we are drawn to most in Anthropologie is the atmosphere. The window displays and walls are just as beautiful as the products they sell. I can't think of any other stores that put as much energy into styling their walls (maybe more)  with things they don't even sell.

So if you are looking to add drama to your walls, or fill a large blank wall with a tiny budget, use a paper sculpture. Here are some links to DIY instructions for Paper Sculpting for Beginners.


Use an old book's pages to create these Pinwheels from The Goods.

Here is another pinwheel Tutorial from WeddingChicks.


This sculpture is made from toilet paper rolls from Design Sponge.


You would not have to sculpt wings, like Simple Joys, but you could use the paper cone sculpting to make other abstract shapes.
Paper+ Pushpins = Paint Free, temporary, dramatic style that is very apartment friendly!

Tuesday, March 27, 2012

O'verlays: Did you know about these?

Okay, I know it seems like I am obsessed with all things over at Gorgeous Shiny Things- well I am definately obsessed with these O'verlays! Thin composite material that you can add to ho-hum furniture for a stylish update.
Check them out at www.myoverlays.com. They are made to fit most Ikea furniture, but they come in many different sizes, so they will probably work on other pieces of furniture. They also do custom pieces.
This is not a paid endorsement, I just love sharing new things!

Tuesday, March 20, 2012

Tuesday Tutorial: Gorgeous Shiny Things Faux Carrera Marble

Gorgeous, Shiny Things: A Great Kitchen
inspiration for a modern, retro look. 
She faux painted an Ikea table like mine.  
And her countertops!
AND managed to successfully keep the integrity of the Mid Century home intact. 

Friday, March 9, 2012

Stylish Appliances

If you are going to have appliances out on your counter, they should be just as stylish as the rest of your home right? Here are some stylish toasters.
DeLonghi has a cute coffee pot and Espresso maker too (both available at Crate and Barrel)- but then again aren't all espresso makers adorable? I think so!
This in not a paid endorsement. 

Wednesday, March 7, 2012

Fabulous Floor Facelifts

What to do when you buy that perfect bungalow, with the seventies carpet you just know is hiding wood floors, and you pull back the shag to find years of water damage, pet stains, or what looks like the scene of a crime?
You could strip, sand, and refinish the floors, or you could add some style with a painted design.
You could totally do this over dull or outdated lanoleum too. I would encourage using an oil based paint and primer over linoleum as it is non porous.
For instructions on how to paint wood floors:
Or
Lori Dunbar of fin and roe via Design Sponge

Wednesday, February 8, 2012

You are my sunshine, my only sunshine

Sunday, January 15, 2012

Welcome Home Pink Couch!

Missy is very glad to have a new couch, she loves it! 
I think also think it looks fantastic! Thank you Kristin for using your super strength to help me (and my super strength) move the couch. I also rearranged the furniture after I took down the Christmas tree.
The new furniture arrangement is maybe not perfect, but at least it doesn't feel quite so much like a bowling alley around here. 
Plus now no one has to sit in the punish chair where they can not see the TV. Oh and I think WD and I look very vintage sitting in our chairs side by side... now I need to learn how to knit. This scene needs knitting. 

Friday, January 13, 2012

Mallory's Quilt

I posted a few rooms involving quilts in December. They were for my bestie,  Mallory. Mallory really wanted a vintage quilt for her master bedroom, but she has a king bed. Unfortunately king sized beds weren't in most homes until the 1970s - meaning finding a pre-70s king quilt is nearly impossible. So I am making her a vintage quilt. Well, I am using vintage material, which is a decent compromise. Here is a preview for you and for her of her quilt.
The color inspiration: Fiestaware.

Thursday, December 1, 2011

Christmas Time Is Here

 I have been up to my eyeballs in Christmas decorating this week. We put up our new tree and have started decorating for Christmas.
I made some earthy/ vintage decorations out of old books from the thrift store. Tutorial coming soon. 
 These are my Shiny Brite ornaments I collect. I decided not to put them on the tree this year because I just love that these are in their original boxes. 
the tape is from the lady at the antique store... seriously lady! Tape on an original box?! UGH!
This will be an evolution, so I will keep you updated as I decorate more and more... 

Sunday, November 20, 2011

Styling with Jewelry

I like to be able to see my jewelry, but conventional jewelry displays have never worked for me. I like large bold pieces that don't fit in traditional jewelry storage solutions. I also wanted to be able to see all of the options clearly.
I decided to display my jewelry in a little vignette in my bathroom. 
This is all you need.  A box of cup hooks, and small screw eyes. 

I predrilled each hole, placing the first 3 necklaces that were about the same length. I began adding other necklaces where I felt they fit best. I drilled each hole based on how I wanted the necklace to hang. Just twist the hooks into the little holes. 
Use the cup hooks for necklaces, and the screw eyes for the dangly earrings. I grouped earrings this time, but you could also mix some of the earrings throughout the necklaces. This is my vignette in the apartment. I had a lot more space there. Patching these tiny holes wasn't really a big deal either.
 I am realizing right now that I must have another box of jewelry somewhere... I am missing more than a few of these pieces.
  Now to store the post earrings, watches, rings, and extra pendants. 
These containers are stackable and lined with felty material to keep the fancy jewelry safe. 
I stack the trays and slide them in the cabinet. In the apartment they were in a drawer.

Tuesday, October 18, 2011

It's BAAAAAAaaack

Easing back into Wall Paper (aka "didn't I just spend the last 10 years peeling/scraping this off the walls of my house"). 
So you are not ready for the full wallpaper room (again), maybe you are nervous you will flash back to childhood memories of floor to ceiling English ivy with matching drapes, accent pillows,  and lampshades (oh was that just me?)... or you have experienced the delight of removing wallpaper-- especially wallpaper that was applied incorrectly... seams mended with Elmer's glue, or applied directly to dry wall... UGH. 
BUT you don't want to miss the beauty, drama , and major style moments. Even adding a small amount of wallpaper can make a BIG statement... just easing into this new world. 
Phase 1. small accents of pattern
A slightly bigger commitment than paint- but oh man do I LOVE the way it looks. 
fancycrib
Vogue
a little glass box
Centsational Girl
fernLIVING.blogspot.com

Phase 2. monochromatic
Select a larger space maybe even a whole room or just an accent wall, but to keep it controlled the monochromatic effect is very yummy. Quiet and stunning. 
Maureen Bowen
 Phase 3. when you are ready for MORE MORE MORE!
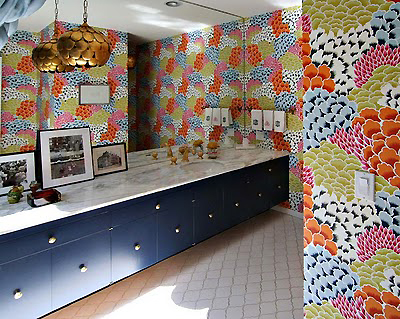
pick a large pattern to keep it modern. I love a bold bathroom. Very unexpected to have such a large statement in such a small room.
HGTV
Which phase are you in.